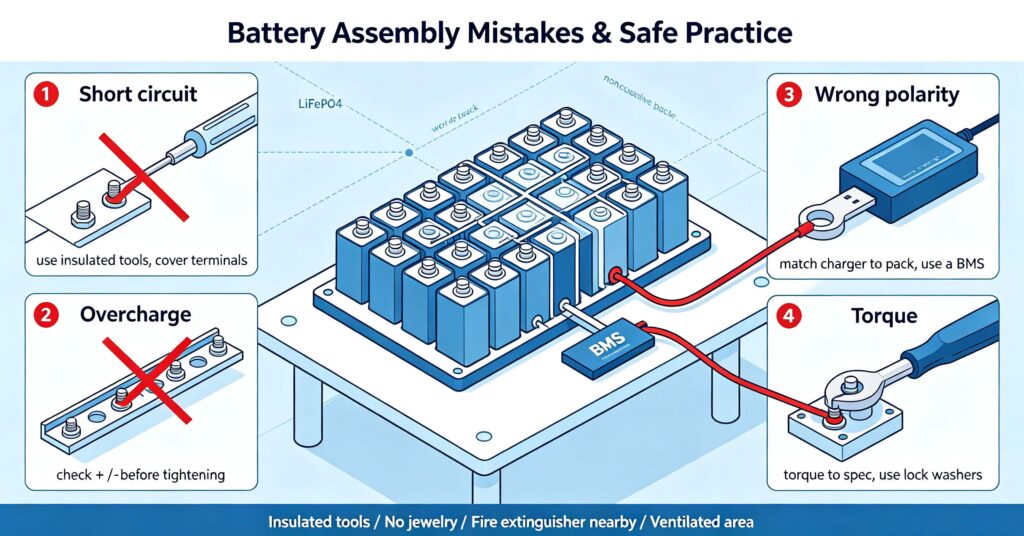
DIY battery safety is the set of practices that prevents the three real hazards of assembling a lithium battery pack — short circuit, wrong polarity, and overcharge — plus the damage from poor mechanical assembly. The most common DIY battery mistakes are: letting a metal tool or loose busbar short the terminals (lithium cells can deliver enough current to weld metal and start a fire instantly); connecting cells or busbars with reversed polarity (which can damage cells and, in a series pack, be dangerous); charging with a charger that does not match the pack voltage and current or without a working BMS (overcharge is the leading cause of lithium battery fires); overtightening or undertightening terminals (which damages cells or creates a high-resistance joint that overheats); ignoring cell-to-cell spacing and cooling (which creates hot spots); and working without basic precautions such as insulated tools, a clean non-conductive bench, no jewellery or rings, and a nearby fire extinguisher. A safe DIY battery build follows a simple checklist: use a BMS matched to the pack, insulate and cover all terminals, check polarity before tightening, torque connections to spec, keep the pack ventilated, and never charge unattended on a flammable surface. Following DIY battery safety turns a risky hobby project into a build that is reliable and fire-safe. For choosing the right enclosure, see #29 DIY battery box and enclosure selection.
Assembling your own LiFePO4 battery is rewarding and, done properly, reliable — but a lithium pack is not forgiving of mistakes. The hazards are real and concentrated in a few avoidable errors. This guide walks through the most common DIY battery mistakes, explains the safety principle behind each, and gives a checklist that keeps a build safe. For the component side of a build, see #06 how to choose a solar battery kit.
Short circuit: the most dangerous DIY battery mistake
A short circuit is the most dangerous mistake in a DIY battery build because a lithium cell can deliver enormous current in an instant. A dropped metal tool across the terminals, a bare busbar touching the case, or a loose connection that bridges two terminals can weld metal, heat the cell and start a fire in seconds.
How to avoid it: work on a clean, non-conductive bench; use insulated tools; remove rings, watches and jewellery; cover or isolate all exposed terminals and busbars as you work; and keep metal objects away from the pack. When assembling, connect one busbar at a time and cover each joint as you go. Never leave a partially assembled pack with exposed terminals unattended.
Wrong polarity: a silent damage risk
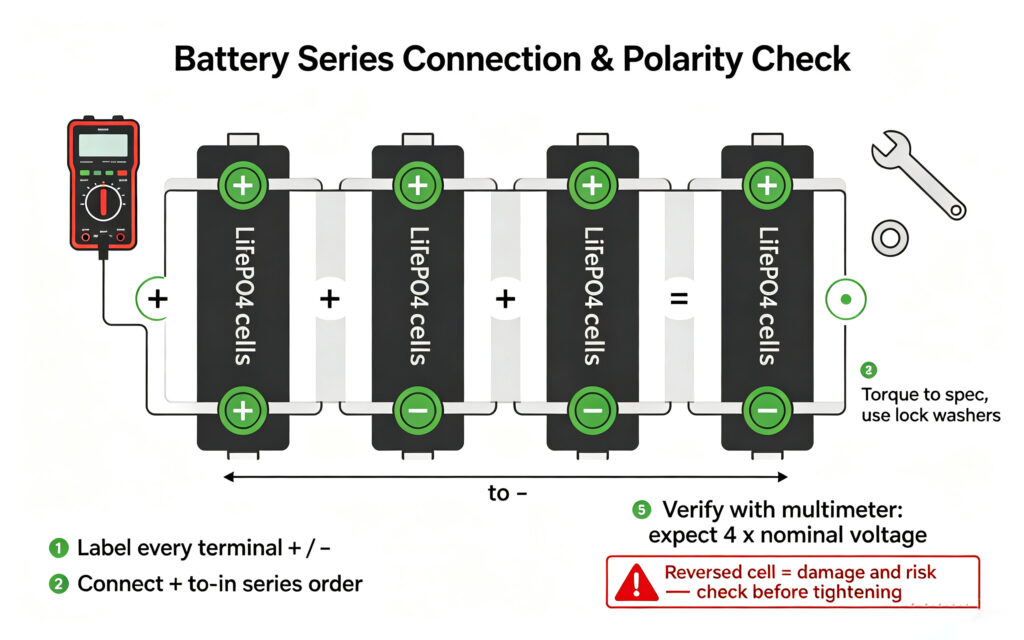
Connecting cells or busbars with reversed polarity is one of the most common serious errors, because it may not cause an immediate dramatic failure but it damages cells and can be dangerous in a series pack.
Reversing a single cell in a series string can force it to be charged backwards by the other cells, damaging it and creating a future risk. The fix is in the habit: label every cell’s positive and negative before assembly, double-check each connection against the wiring diagram before tightening, and use a multimeter to verify the pack voltage at each stage. If the pack voltage does not match the expected value for the series count, stop and check before continuing.
Overcharge and the missing BMS
Overcharge is the leading cause of lithium battery fires, and in DIY builds it usually happens because the builder charges without a working BMS or with a charger that does not match the pack.
The BMS is not optional: it stops charging at the pack’s upper voltage limit and is the primary protection against overcharge. If you build without a BMS, or bypass it to “test” the pack, you remove the only thing standing between the cells and overvoltage. The charger must match the pack’s voltage and current: a 48V/51.2V LiFePO4 pack needs a charger set for its absorption voltage, not a generic charger. Never charge a DIY pack unattended on a flammable surface, and stop charging if a cell heats unusually. For BMS basics in a build, see #28 battery management system 101.
Mechanical, thermal and housekeeping mistakes
Beyond the electrical hazards, a few mechanical and housekeeping mistakes undermine an otherwise safe build.
Torque: overtightening a terminal can crack a cell’s post or strip threads; undertightening creates a high-resistance joint that heats under load. Use the manufacturer’s torque spec, a torque wrench, and lock washers to keep joints from loosening with vibration.
Cooling and spacing: cells packed too tightly with no spacing trap heat and create hot spots. Keep the manufacturer’s recommended spacing and add ventilation in the enclosure. High-temperature operation accelerates aging and raises thermal risk. See #29 DIY battery box for enclosure and cooling.
Housekeeping: work in a ventilated area, keep a Class D or ABC fire extinguisher within reach, charge on a non-flammable surface, and do not leave a charging or testing pack unattended. These simple habits materially reduce the risk of a build.
A safe DIY battery checklist
Run through this checklist on every DIY battery build before and during assembly.
- Before starting: a BMS matched to your pack, a charger matched to voltage and current, insulated tools, a clean non-conductive bench, no jewellery, and a fire extinguisher nearby.
- During assembly: label every terminal, check polarity against the diagram before tightening, torque to spec with lock washers, cover exposed terminals as you go, and verify pack voltage with a multimeter at each stage.
- Cooling and enclosure: keep cell spacing per spec, ventilate the enclosure, and place the pack away from flammable materials.
- Charging and testing: charge with the correct charger through the BMS, on a non-flammable surface, and do not charge unattended. Stop if any cell heats unusually.
For choosing cells, BMS and enclosure together, see #06 how to choose a solar battery kit.
Q. Is it safe to build your own LiFePO4 battery?
Yes, if you follow proper DIY battery safety. The hazards are real but preventable: use a BMS matched to the pack, a charger set for the correct voltage, insulated tools, and a non-conductive bench. Check polarity before tightening, torque to spec, keep the pack ventilated, and never charge unattended. Follow the checklist and the build is reliable; skip it and you risk a short or an overcharge fire.
Q. What is the most dangerous mistake when building a battery?
A short circuit is the most dangerous because a lithium cell can deliver enough current to weld metal and start a fire instantly. It happens when a metal tool or bare busbar touches the terminals, or a loose connection bridges two terminals. Avoid it by working on a non-conductive bench with insulated tools, removing jewellery, covering exposed terminals as you work, and never leaving a partially assembled pack unattended.
Q. Why do I need a BMS for a DIY battery?
The BMS is the primary protection against overcharge, overdischarge, overcurrent and temperature faults. Without a working BMS, nothing stops the pack from charging past its upper voltage limit, and overcharge is the leading cause of lithium battery fires. The BMS also balances cells and reports their state. Building without one, or bypassing it to “test”, removes the only protection standing between the cells and overvoltage.
Q. How do I check polarity before connecting cells?
Label every cell’s positive and negative terminal before assembly, and check each connection against the wiring diagram before tightening. Use a multimeter to verify the pack voltage at each stage: a 4S LiFePO4 pack should read about 4 x 3.2V nominal (around 12.8V) at rest. If the voltage does not match the expected value for your series count, stop and re-check. Reversing a cell damages it and is a real risk.
Q. How do I safely charge a DIY battery pack?
Use a charger matched to the pack’s voltage and current, and charge through the BMS so overcharge protection is active. Place the pack on a non-flammable surface in a ventilated area, and do not charge unattended. Stop charging if any cell heats unusually or if the pack smells. Set the charger to the correct absorption voltage for your chemistry, and never charge a pack you have not verified with a multimeter.
Next step: build safely with the right parts and protection
DIY battery safety comes down to a short checklist that prevents the real hazards: short circuits, wrong polarity, overcharge and poor mechanical assembly. Use a matched BMS and charger, insulated tools and a clean bench, check polarity before tightening, torque to spec, and never charge unattended. Build it safely and it will be reliable for years.
- Choose the right kit in #06
- Pick a safe enclosure in #29
- Understand the BMS in #28
- Ask leekooenergy for a DIY battery safety and component guide that includes: a BMS matched to your pack’s series count and voltage, a charger set for the correct voltage and current, cell selection and spacing guidance for safe thermal performance, enclosure and ventilation requirements, and a build checklist covering polarity, torque and charging safety — so your DIY battery is assembled to a standard that is both reliable and fire-safe