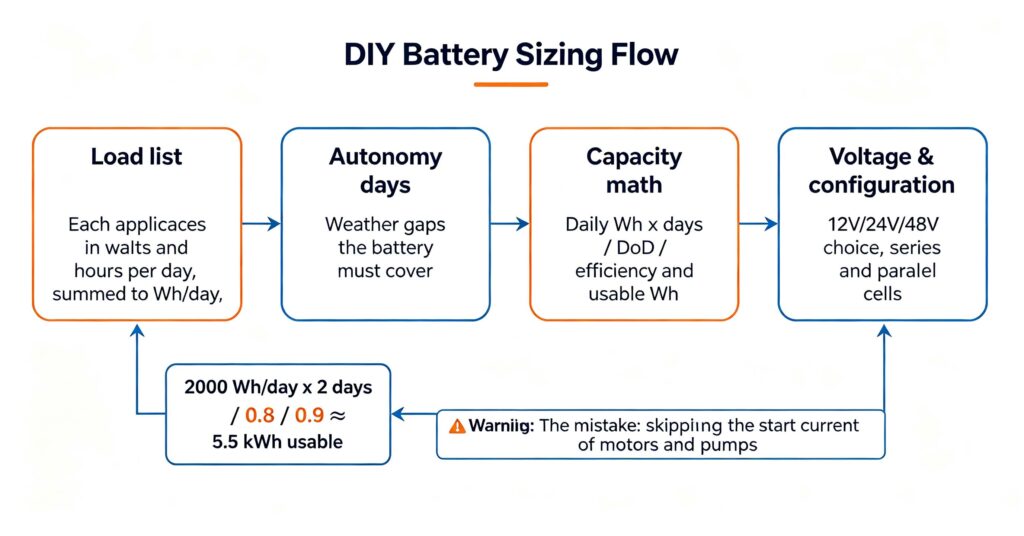
DIY battery sizing is the process of turning your loads, autonomy requirement and chemistry limits into a battery capacity number — and it is a four-step calculation, not a guess: total the daily energy in watt-hours, multiply by the days of autonomy the site must survive, divide by the usable fraction (depth of discharge and system efficiency), then choose the voltage and cell configuration that delivers that capacity. For a typical cabin or backup system the math looks like: daily load (Wh) × autonomy days ÷ (DoD × efficiency) = required usable battery energy. The most common DIY errors are skipping the start current of motors and pumps, sizing on summer usage alone, and ignoring inverter efficiency in the usable-energy calculation. The same method works for any size system; only the numbers change.
Most DIY battery projects fail in the spreadsheet, not on the workbench — the parts list is bought before the energy math is done. This guide gives the calculation method, a worked example and the cost build-up that keeps the project honest. For the component list that goes with the sizing, see #95 DIY solar panel kit: components and wiring.
The four-step DIY battery sizing method
The method is the same whether the system is a small backup bank or a cabin installation. Each step changes the number, and each step can be verified.
- Build the load list in watt-hours: for every appliance, record watts, hours per day, and days per week. Sum to daily energy. Be honest about seasonal loads — the worst season sets the size.
- Choose days of autonomy: the number of days the system must run without meaningful input. A few days is typical; the generator reduces this requirement.
- Apply the usable fraction: divide by the depth-of-discharge limit (e.g., 0.8 for LiFePO4 in practice) and by system efficiency (roughly 0.85–0.9 including inverter and wiring losses).
- Convert to amp-hours at the chosen voltage: usable Wh ÷ system voltage = Ah. Then choose cells and series/parallel configuration to match voltage and capacity.
The result is the minimum battery; adding a margin for measurement error and future loads is normal, but oversizing by doubling is wasted money. For the system-level kWh logic that parallels this, see #9 how to size a home battery.
A worked example: cabin backup battery
Walking a real case makes the formula concrete. The numbers below are an example, not a recommendation for every site.
Step 1 — daily load: lighting 300 Wh, refrigeration 800 Wh, phone and small devices 200 Wh, occasional power tools 500 Wh → about 1,800 Wh/day, with a worst-season figure of 2,000 Wh/day.
Step 2 — autonomy: the site gets cloudy stretches, and there is a generator for emergencies → 2 days of autonomy.
Step 3 — usable fraction: LiFePO4 at 80% DoD, system efficiency 0.9 → 2,000 × 2 ÷ 0.8 ÷ 0.9 ≈ 5.6 kWh usable battery energy.
Step 4 — voltage and configuration: at 48V, 5,600 Wh ÷ 48V ≈ 117 Ah → a 48V pack of roughly 120 Ah, built from cells in the right series/parallel arrangement.
For how the voltage choice affects wiring and inverter compatibility, see #35 48V lithium batteries explained.
Cost estimates that keep the project honest
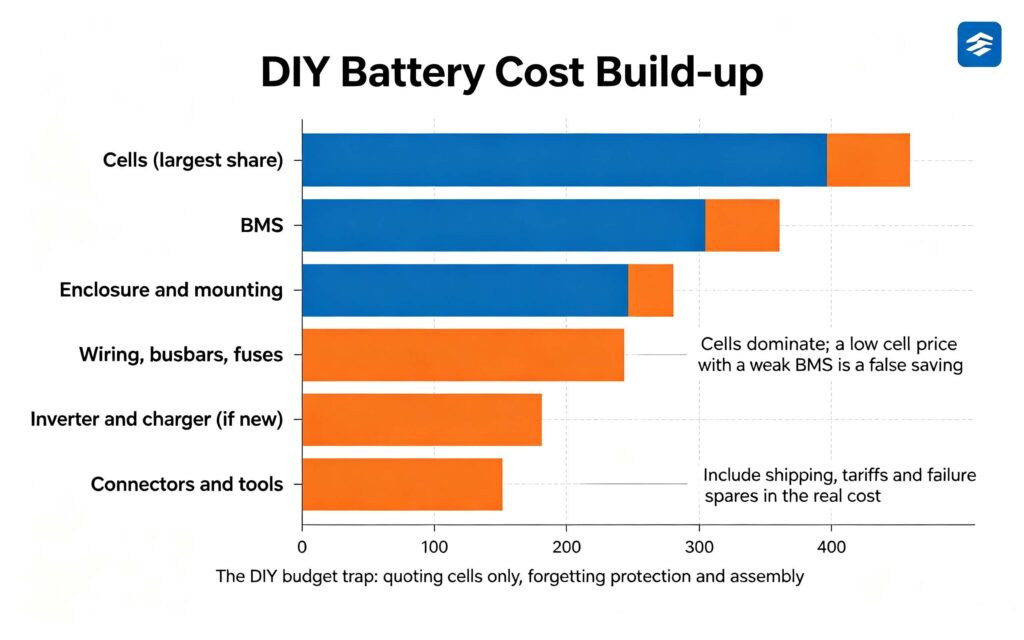
DIY battery sizing should include a cost build-up, because a parts list that ignores protection and assembly is not a real price.
| Cost item | Why it belongs | Common omission |
|---|---|---|
| Cells | The largest share; quality varies by grade and source | Grade differences that surface in capacity and life |
| BMS | Protects the pack; a weak BMS voids the whole project | Choosing price-first BMS |
| Enclosure and mounting | Mechanical and fire containment | Underestimating the box and busbars |
| Wiring, fuses and connectors | Safety-critical; undersized wiring is the classic failure | Treating wire as an afterthought |
| Inverter and charger | Converts and manages energy; new or reused | Forgetting the power side |
Add shipping, taxes and one spare cell to the estimate; the real cost is the total, not the cell quote. For the safety side of assembling the pack, see #113 DIY battery safety: common assembly mistakes.
Common DIY sizing mistakes and the fixes
The errors repeat across projects, and each has a cheap fix at design time and an expensive one after build.
Ignoring start current: pumps and motors draw several times running watts at start. Check inverter surge rating against the largest load.
Sizing on the best season: the worst week sets the size. If summer is the only season considered, winter kills the system.
Forgetting losses: inverter and wiring losses make the usable energy lower than the rated capacity. The formula above builds them in.
Skipping the BMS in the plan: a pack without a properly configured BMS is a fire risk and a warranty void. For the BMS role in the pack, see #28 battery management system 101.
Q. How do I calculate battery capacity for a DIY project?
Multiply the daily energy in watt-hours by the days of autonomy, then divide by the usable fraction — the depth of discharge limit times system efficiency. For example, 2,000 Wh per day, 2 days of autonomy, 80% DoD and 90% efficiency gives about 5.6 kWh usable. Convert to amp-hours by dividing by your system voltage.
Q. What voltage should my DIY battery bank use?
It depends on system size: 12V suits small loads and short runs, 24V is a step up for medium loads, and 48V is the practical standard for anything beyond a small cabin because current is lower, wiring is cheaper and inverter selection is wider. Match the voltage to the inverter range and keep the whole system at one voltage family.
Q. How much does a DIY battery cost?
The cost is dominated by cells, then BMS, enclosure, wiring, fuses and connectors, with the inverter and charger adding a large share if they are new. Shipping, taxes and a spare cell belong in the estimate. The honest number is the total of every item, not the cell quote alone.
Q. How many days of autonomy should I design for?
Typically a few days for most off-grid and backup systems, balancing battery cost against outage risk. More autonomy means a bigger, more expensive battery; less autonomy means more generator runs or risk of running out. A generator in the design lets you size the battery for normal conditions and cover the rare gap with fuel instead.
Q. What is the biggest mistake in DIY battery sizing?
The biggest mistake is sizing on the best season and skipping start currents: a system that works in summer fails in winter, and motors or pumps stall a bank sized on running watts. Forgetting inverter and wiring losses also leaves the system short of usable energy. The fix is an honest worst-week load list and the full formula, not a quick guess.
Next step: do the math before the shopping
DIY battery sizing is a spreadsheet exercise that saves real money and real failures: honest loads, days of autonomy, the usable fraction and the full cost build-up. Verify each number, and confirm the BMS and safety items are in the parts list before you buy cells.
- Cross-check the system math in #9
- Build the component list in #95
- Keep the assembly safe in #113
- Ask leekooenergy for a DIY-friendly battery kit quotation: cells, BMS, enclosure and wiring sized to your load math — with the BMS configured so the pack you build matches the number you calculated