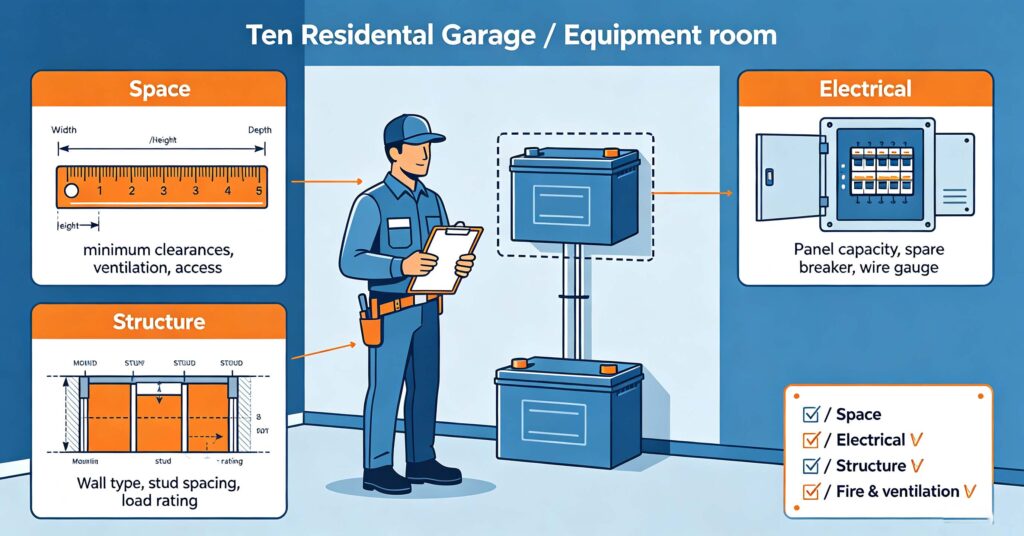
Battery installation site assessment is the pre-install survey of space, electrical capacity, structure and environment that determines whether a battery can be safely and legally installed at a location, and what the installation will require. It covers three main areas: space (enough clearance around the battery for airflow, service access and code-required separation, plus ventilation and a suitable indoor location), electrical (panel capacity and spare breaker space, wire and breaker sizing for the battery’s charge/discharge current, grounding, and interconnection requirements), and structure (wall type and load rating for wall-mounted batteries, floor load for floor-standing or rack systems, and mounting hardware that meets the battery’s weight). The site assessment also checks environmental conditions (temperature range, moisture, fire rating of the room, proximity to the grid connection) and any local code requirements such as NFPA 855, UL 9540 and the applicable electrical code. Doing the assessment before ordering avoids surprises: a battery that fits electrically but not physically, a wall that cannot hold the weight, or a room that fails code all become expensive discoveries mid-install. A proper battery installation site assessment takes a checklist through each category, records measurements, and feeds the results into the equipment and installation plan. For the overall installation process and cost, see #13 home battery installation: process and cost.
Most battery installation problems are found during the work, not before — and they are almost all preventable with a proper site assessment. Checking space, electrical capacity and structure in advance turns a guess into a plan. This guide explains the three main assessment areas, gives a checklist you can use on site, and covers the common oversights. For the electrical side of choosing a compatible battery, see #35 48V lithium batteries explained.
Space and environment assessment
Space is the first thing to verify, because physical fit is the least forgiving. Measure the intended location and compare it against the battery’s dimensions plus required clearances.
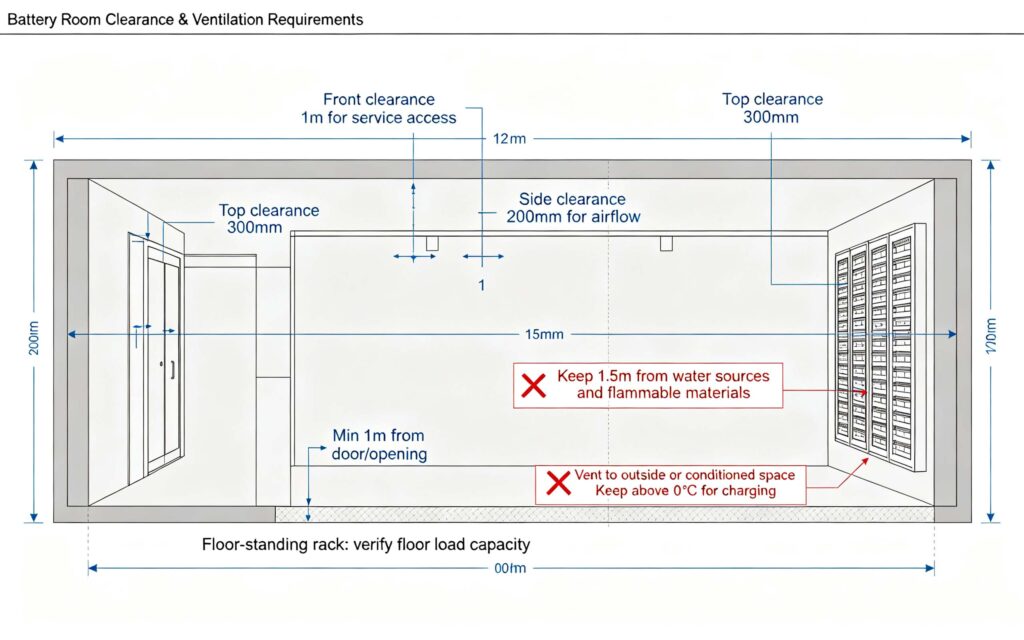
Key checks: the footprint and height of the battery fit the space with the manufacturer’s recommended clearance (typically 100-300mm around the unit for airflow and service); the door and path to the location allow the battery to be moved in (account for weight and turning radius); the room is indoors, dry and within the battery’s operating temperature range (most LiFePO4 batteries: -10°C to 50°C operating, charging only above 0°C); there is adequate ventilation; and the location is away from water sources, flammable materials and direct sun. For indoor installations, local codes may require the battery be in a room with a specific fire rating or separated from occupied space. Confirm the environment before committing to the location.

Electrical assessment
The electrical assessment confirms the site can safely feed and receive the battery’s power. This is where most technical rejections happen.
Key checks: the main service panel has capacity and a spare breaker slot for the battery circuit (or space for a sub-panel); the panel’s rating and the wire gauge can handle the battery’s continuous charge/discharge current (for a 5kW inverter, around 20-25A at 240V, more at 120V); a suitable disconnect and overcurrent protection are in place per code; grounding is correct; and the grid interconnection meets the utility’s requirements for the site. For larger systems, a load calculation confirms the panel and transformer can take the added circuit. If the panel is full or undersized, the assessment flags an upgrade before installation starts.
Structural assessment
The structural check confirms the building can carry the battery’s weight and withstand mounting without damage.
For wall-mounted batteries: identify the wall type (drywall over studs, masonry, concrete), verify the stud spacing and that the mounting points land on studs, and check the wall can support the battery’s weight (a typical home battery is 100-300kg, so the mount must be rated for it and anchored into structure, not just drywall). For floor-standing or rack systems: verify the floor can bear the concentrated load, especially on upper floors, and use the supplied feet or a suitable stand to distribute the weight. The assessment should record the wall/floor type and confirm the mounting plan before installation.
The pre-install assessment checklist
Use this checklist on every battery installation site assessment to catch the common failures before they become problems.
- Space: footprint and height fit; clearances meet spec; path for moving the unit in; dry indoor location; within temperature range.
- Ventilation: adequate airflow; not sealed in a tight cabinet unless designed for it.
- Electrical: panel capacity and spare breaker; wire and breaker sizing; disconnect and overcurrent protection; grounding; utility interconnection requirements.
- Structure: wall type and stud spacing for wall mounts; floor load for floor systems; mounting hardware rated for the weight.
- Environment and code: away from water and flammables; fire rating of room; compliance with NFPA 855, UL 9540 and local electrical code. For the fire-safety side of a compliant installation, see #87 battery thermal runaway and NFPA 855.
For commissioning and grid connection after the assessment and install, the next step is covered in the commissioning guide; see #13 home battery installation for the full process.
Q. What is a battery installation site assessment?
It is the pre-install survey of a location before installing a battery, covering space, electrical capacity, structure and environment. The goal is to confirm the site can safely and legally accept the battery and to flag any upgrades needed. It checks clearances, panel capacity, wall or floor load, ventilation and code compliance, so problems are found before the work begins rather than during it.
Q. What clearance does a battery need for installation?
Check the manufacturer’s spec, but a common guide is 100-300mm of clearance around the unit for airflow and service access, plus at least 1m of front access for maintenance. Wall-mounted and floor units differ, and rack systems need access to the front for cells and BMS. Always follow the datasheet clearance and keep the unit away from water, flammables and direct sun.
Q. Can I install a battery on a drywall wall?
Only if the mounts are anchored into the structure behind it. A typical home battery weighs 100-300kg, so the wall mount must be rated for the weight and secured to studs, masonry or concrete — drywall alone cannot hold it. The site assessment should confirm the wall type and stud spacing, and the mounting plan should land on structure. Use the manufacturer’s mount and torque spec.
Q. What electrical checks are needed before battery installation?
Confirm the main panel has capacity and a spare breaker slot, the panel and wire gauge can handle the battery’s continuous charge/discharge current, and proper disconnect, overcurrent protection and grounding are in place. Also verify the utility interconnection requirements for the site. A load calculation may be needed for larger systems to confirm the panel and transformer can take the added circuit.
Q. Why is a site assessment done before ordering a battery?
Because physical, electrical or structural problems discovered mid-install are expensive and slow. A battery that fits electrically but not physically, a wall that cannot hold the weight, or a room that fails code all cause rework. A pre-install assessment records the space, panel capacity, wall and floor load, and code requirements, feeding them into the equipment and installation plan so the job goes smoothly the first time.
Next step: run a proper site assessment before you install
A battery installation site assessment turns a guess into a plan. Checking space, electrical capacity, structure and environment in advance prevents the costly mid-install discoveries that most battery projects hit. Use the checklist, record the measurements, and feed the results into your equipment and installation plan before you commit.
- Follow the full installation process in #13
- Choose the right voltage in #35
- Ask leekooenergy for a battery installation site assessment guide that includes: the clearance and space requirements for your battery model, electrical panel and breaker sizing for your system, structural mounting requirements for the wall or floor, environmental and ventilation requirements, and a pre-install checklist you can use on site — so your battery installation is planned against the real conditions of your site, not discovered the hard way