A home battery installation has six stages: site assessment, permits, mounting, electrical wiring, commissioning, and inspection. Most delays come from the permit and approval steps, not the hardware. Budget for both equipment and a qualified installer — and use the acceptance checklist before you sign off.
Step 1 — Site assessment
A proper install starts with the wall and the load. The installer checks: available wall space and structure, clearances from living areas, ambient temperature, and whether the existing panel and inverter can accept a battery. They also confirm the backup loads you actually want during an outage — fridge and circuits, not the whole house, is usually enough.
Step 2 — Permits and approvals
Grid-tied systems need permits and often utility interconnection approval. Timelines vary by region; this is the step most homeowners underestimate. Ask the installer for the expected permit window in writing and whether inspection is required before energizing.
Step 3 — Mounting
Mounting rules of thumb: fix to a structural wall, keep the manufacturer’s minimum clearance (typically 10–20 cm) for ventilation and service, and never enclose the unit in a sealed cabinet. LiFePO4 is safe, but it still needs airflow and accessible disconnects.
Step 4 — Electrical wiring
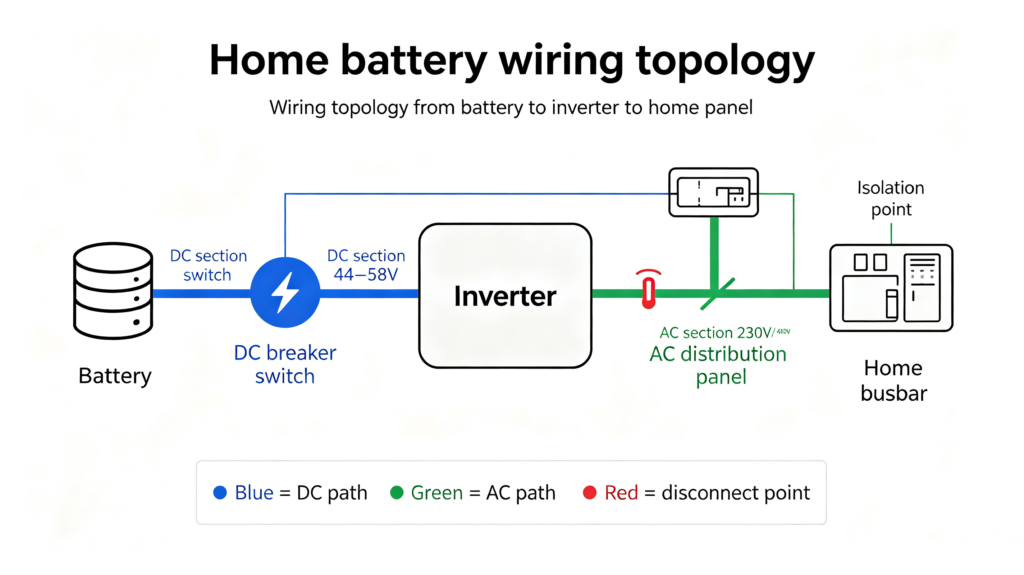
The battery connects to the inverter/PCS over properly sized DC cabling with a dedicated disconnect and overcurrent protection. Wire gauge must match the current, not the label. This is not a DIY step for grid-tied systems — use a licensed electrician.
Step 5 — Commissioning
Once wired, the system is powered up, the BMS is read, and the inverter is set to the correct charge profile for LiFePO4. The installer verifies communication between battery and inverter and runs a short backup test by simulating grid loss.
Step 6 — Inspection and handover
A final inspection (where required) confirms code compliance. Keep the commissioning report and warranty documents. You should receive a clear explanation of the monitoring app and the maintenance expectations.
Cost components
| Component | Typical share | Note |
|---|---|---|
| Battery hardware | Largest | Scales with kWh |
| Inverter / PCS | Medium | New or reuse existing |
| Labor & wiring | Medium | Varies by region |
| Permits & inspection | Small–Medium | Often overlooked |
| Monitoring & commissioning | Small | Usually bundled |
Acceptance checklist (before sign-off)
- Mounting clearances and structure confirmed to spec.
- Dedicated DC disconnect and correct overcurrent protection present.
- Cable gauge matches the inverter’s rated current.
- BMS–inverter communication verified live.
- Backup test performed (grid-loss simulation).
- Permits closed and commissioning report delivered.
- Monitoring app demonstrated and warranty explained.
What each installation step involves
1. Site assessment
A qualified installer measures available wall or floor space, checks the distribution panel for spare capacity, and estimates daily load and backup hours. They confirm whether the meter is net-metered and whether the battery must island (run the whole home) or only critical loads. This step decides cabinet size and whether a sub-panel is needed.
2. Permits and approvals
Most regions require an electrical permit and inspection; some require fire-department sign-off for lithium systems. Lead time here often exceeds the hardware lead time, so start early. The installer handles drawings, but the homeowner should confirm HOA or utility interconnection rules.
3. Mounting
Wall-mounted units go on a load-rated wall with clearance for ventilation and service. Floor cabinets need a level base and, for garages, protection from vehicle impact. Indoor placement keeps cells in a stable temperature band and extends life.
4. Electrical connection
The inverter ties to the panel via a dedicated breaker; the battery connects to the inverter’s DC terminals with torque-spec’d lugs. Correct wire gauge and overcurrent protection are not optional — they are the difference between a safe system and a fire risk.
5. Commissioning
The installer sets charge limits, configures the BMS, and runs a controlled charge/discharge test. They verify the system isolates on grid loss if backup was specified, and that the app or display reports correctly.
6. Inspection and handover
The authority having jurisdiction signs off; the installer labels disconnects and leaves the manual and warranty. The homeowner learns how to read state of charge and when to call support.
Cost breakdown by share
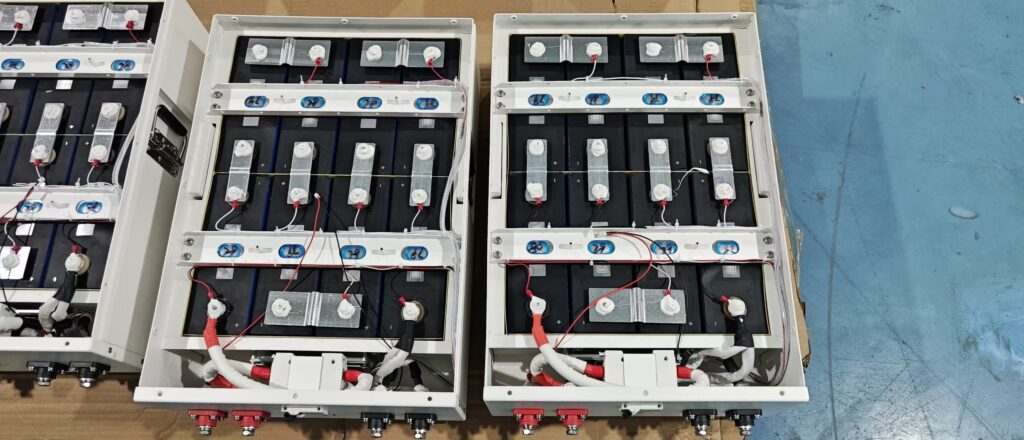
For a typical home install, the battery itself is often the largest single share, followed by the inverter, then labor and permits. Balance-of-system (breaker, cabling, sub-panel, mounting) and the electrical permit/inspection each add a meaningful slice. Exact split varies by region and whether solar is already present; request an itemized quote so you can compare suppliers on more than the battery price alone. A battery is a high-energy system, not a consumer gadget, so a licensed installer protects the warranty, the home, and the utility interconnection — DIY connection of high-voltage DC is the most common cause of ruined equipment and denied claims.
Acceptance checklist (what to verify at handover)
- Disconnects labeled and reachable; emergency shutdown explained.
- State of charge and backup mode visible on the display or app.
- Grid-loss test performed and documented (if backup specified).
- Charge/discharge limits set per the cell datasheet.
- Warranty and serial numbers recorded; installer contact saved.
Common delays and how to avoid them
The two predictable delays are permitting and panel capacity. Start the permit while hardware ships, and ask the installer to confirm spare breaker spaces before ordering. If the panel is full, budget for a sub-panel or upgrade in the same visit rather than a return trip.
Safety standards to expect
Residential lithium storage in major markets is built to enclosure and battery standards (for example the IEC 62619 / UL 9540A family depending on region). Ask the installer which standards the installed system meets; the answer tells you whether the enclosure has proper thermal-runaway containment, not just cell-level certificates.
Whole-home vs critical-loads backup
An islanding (whole-home) setup powers everything but needs a larger inverter and often a sub-panel; a critical-loads setup powers only selected circuits and costs less. Decide by which appliances must run during an outage — fridge and lights versus AC and a well pump change the size dramatically.
Warranty and service basics
Home batteries are typically warranted for a number of years or a throughput limit (total kWh cycled), whichever comes first. Understand which one your quote uses; a throughput limit matters more for daily-cycling backup users. Keep commissioning records — they speed any future warranty claim.
Permit types you may encounter
While exact rules vary by region, most home battery installs touch the same few approvals: an electrical permit from the local authority, an inspection of the completed work, and sometimes a fire or building sign-off for lithium systems. Grid-tied systems may also need utility interconnection approval, especially if export is enabled. Ask the installer for the full list up front so nothing surfaces after the hardware arrives.
Signs you picked the right installer
- They assessed load and backup hours before quoting a size.
- They itemized battery, inverter, labor, and permit separately.
- They named the enclosure safety standard the system meets.
- They explained islanding vs critical-loads in plain terms.
- They committed to a commissioning and grid-loss test, not just delivery.
Cost factors that move the quote
Beyond the battery itself, three things shift a home install price most: whether solar already exists (retrofit needs an extra interface), the panel’s spare capacity (a sub-panel adds cost), and the enclosure rating your code requires. Remote or hard-to-access walls add labor. Ask for these line items specifically so two quotes are truly comparable, not just two battery prices.
After installation: first 30 days
Watch the app for the first month. State of charge should follow your solar and usage pattern; cycles should be smooth, not erratic. Note any alarm and report it during the warranty window rather than waiting. A short log of early behavior also helps if you later expand the system or add solar.
Export and grid-tied nuances
If the battery is wired for export, the interconnection approval and the utility’s export limit apply; some regions cap how much you can push back. Confirm the limit before sizing around export revenue, and let the installer set the export cap in commissioning so the system stays compliant without manual monitoring.
Q. How long does home battery installation take?
The on-site work is often one day. The permit and approval window is the variable — it can be days to weeks depending on your region and utility.
Q. Can I install a home battery myself?
Off-grid, low-voltage DIY kits are possible for experienced users. Grid-tied systems with high-voltage DC should be installed by a licensed electrician for safety and code compliance.
Q. Do I need permits for a home battery?
In most regions, yes for grid-tied systems. Off-grid and portable setups may be exempt. Confirm with your local authority and utility.
Q. What does a home battery installation cost?
It combines hardware, inverter, labor, and permits. The hardware scales with capacity; labor and permits vary by location. Get a written quote that separates each line.
Q. How do I verify the install was done right?
Use the acceptance checklist above: clearances, disconnect, correct cabling, live BMS communication, a backup test, and a closed permit with commissioning report.
Ready to install?
choose Residential Battery Storage,and compare Residential Battery Capacity Calculation Guide size the system first, then review Backup Power Analysis to judge the use case. Installation should be carried out by a licensed electrician.
For full specifications and B2B pricing, contact the leekooenergy team with your load profile and target region.