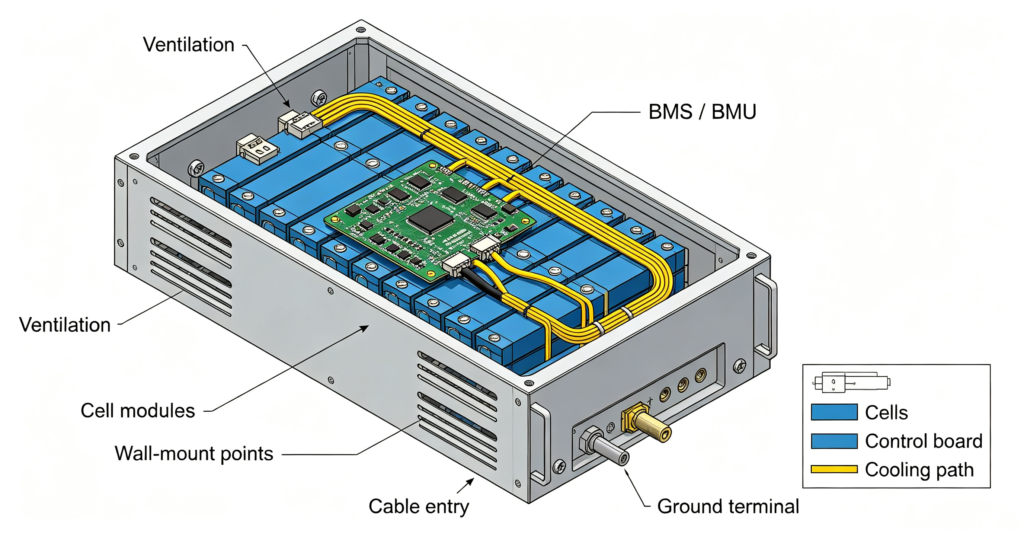
A solar battery box is the enclosure that holds your cells, BMS, and wiring — and the right one is decided by three things: it must fit your pack dimensions, manage heat, and meet a fire rating for where it sits. Pick the box after you know your cell count, voltage, and wall type, not before. A box that fits the cells but traps heat or lacks a fire rating is a liability, not a saving.
DIY builders often start from the cells and forget the box until the end. The enclosure is where safety and code compliance actually live, so choose it with the same care as the cells.
What the box must do
- Contain. Hold cells and BMS rigidly with no movement or short risk.
- Cool. Vent or conduct heat away; LiFePO4 prefers a stable temperature band.
- Protect. Resist impact, moisture, and — for indoor walls — meet a fire rating.
- Connect. Give clean entry for busbars, comms, and the inverter cable.
5-step selection checklist
- Measure the pack. Cell dimensions × count + busbars + BMS; add clearance.
- Pick the form. Wall-mounted (home), floor cabinet (garage), or rack (C&I).
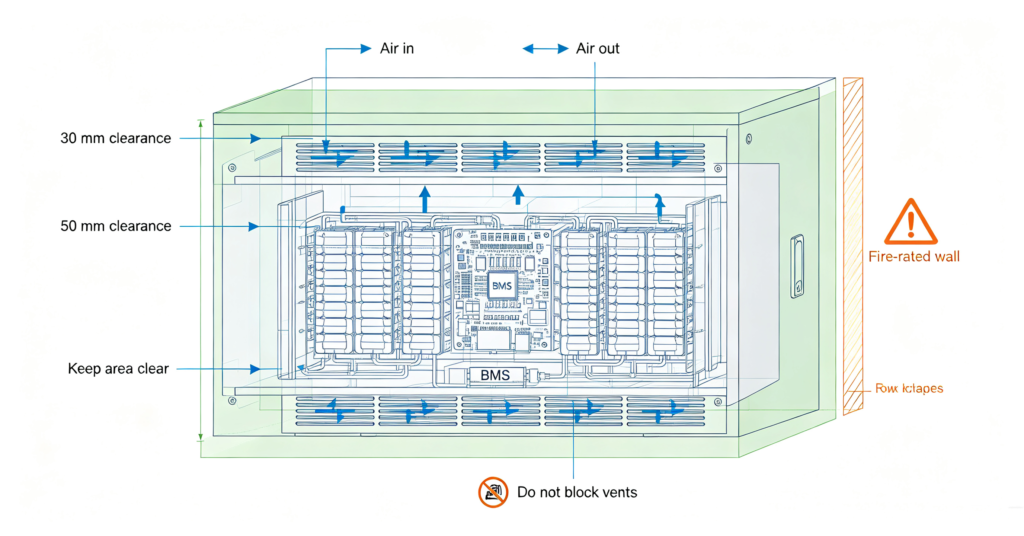
- Check cooling. Passive vents for small banks; active fan or conduction for large.
- Confirm rating. For indoor walls, ask the enclosure’s fire rating in your market.
- Verify entry. Gland size for your cable; grounded terminal; service access.
Wall-mounted vs floor cabinet vs rack
| Form | Fits | Pros | Watch-outs |
|---|---|---|---|
| Wall-mount | Small residential capacity | Space-saving, quiet | Wall load rating, fire rating |
| Floor cabinet | Garage / server room | Easy maintenance, scalable | Footprint, impact protection |
| Rack | C&I multi-module | Stackable, standard | Needs cabinet & wiring |
Fire protection and rating
For an indoor wall box, the enclosure’s fire rating matters more than the cell certificate — it is what contains a thermal event. Ask the supplier which standard the box meets; a bare metal case is not a rated enclosure. The kit guide covers what a complete kit should include so you are not sourcing the box alone.
What to confirm with the supplier
- Internal dimensions vs your actual pack (cells + busbars + BMS).
- Cooling method and max continuous power the box is rated for.
- Fire/impact rating and the standard it meets in your market.
- Cable gland size and whether a grounding point is provided.
Common mistakes
Buyers buy the cheapest box that “looks right” and find the pack does not fit, or the vents are wrong for the heat. Measure first, rate second, price third — a box is safety hardware, not a cosmetic case.
Measure the pack before you buy the box
Dimensions decide everything. Take cell length times count in the series string, add busbar height and BMS thickness, then add clearance for airflow and a service finger. A 16S LiFePO4 wall pack is taller and deeper than a bare cell stack suggests once busbars and a BMU are in. Measure the real assembly, not the cell datasheet, or the box arrives and the pack will not seat. A tight box also traps heat – clearance is cooling, not wasted space.
Ventilation design for a DIY box
Passive vents at bottom and top create convection that carries heat out; active fans force it. For a small home bank in a cool room, passive often suffices. For a garage in summer or a large bank, plan active cooling with a thermostat trip. The enclosure job is to move heat away as fast as the cells make it; size vents to the bank heat, not the box looks.
Wall mount vs floor: structural notes
A wall box needs a load-rated wall and secure anchors; a floor cabinet needs a level base and, in a garage, protection from vehicle impact. Wall saves floor space and stays at a stable temperature; floor is easier to service and expand. Pick by the room, not the photo – a box you cannot service is a box you will regret.
Pre-assembly checklist
- Internal dimensions vs real pack, with clearance.
- Cooling method and rated continuous power.
- Fire or impact rating for the location.
- Cable gland size and grounded terminal present.
- Service access without dismantling the pack.
One last check before assembly
Before you seat the cells, dry-fit everything once: pack in box, busbars on, BMS in place, lid clear. If it binds, fix the box, not the pack. A box that needed force at dry-fit will fight you at wiring time and risk a short. The enclosure is the frame your DIY bank stands on – get the fit right first.
Q. Do I need a special box for LiFePO4 cells?
You need an enclosure that fits the pack, manages heat, and meets a fire rating for its location. LiFePO4 is stable, but the box is what contains any fault — so a rated, vented enclosure matters as much as the cells.
Q. Can I use a plastic box for a home battery?
Only if it is a rated, non-combustible enclosure suited to the location and heat. For indoor walls, a metal box with a fire rating is the norm; check your market’s standard before choosing plastic.
Q. How do I size the enclosure to my cells?
Add cell dimensions × count, busbar height, and BMS, then add clearance for airflow and service. Measure the real pack, not the nameplate — a tight box traps heat and complicates wiring.
Q. What fire rating should a battery box have?
It depends on your market and mounting location; ask the supplier which enclosure standard applies. The box rating — not the cell certificate — is what contains a thermal event indoors.
Q. Is a DIY box safe with a proper BMS?
A BMS protects the cells, but the box protects the room. Both are needed: the BMS prevents faults, the rated enclosure contains them. Skipping either defeats the other.
Next step: measure first, then pick the enclosure
Write down your pack dimensions, heat load, and wall type, then match a box with clearance and a fire rating. A correct enclosure is the frame your DIY bank stands on.
ask the supplier for the cabinet fire-rating certificate
See the leekooenergy battery cabinet / enclosure product page
use #6 Kit Checklist to check the included items