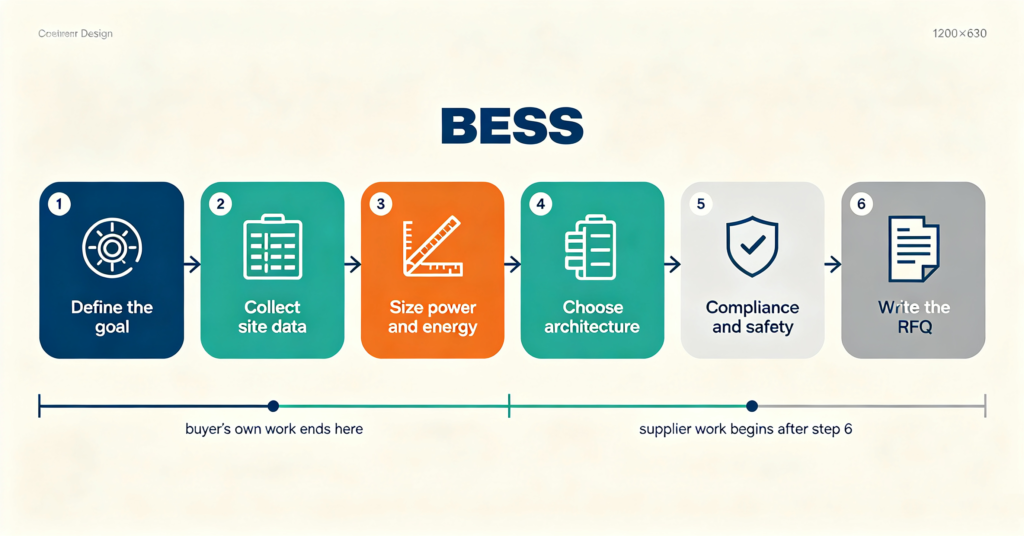
Battery energy storage system design is the process of turning a business goal into a written specification — power, energy, architecture, compliance and performance terms — that suppliers can price and deliver against. Done well, the design work happens before sales conversations, because a buyer who arrives with load data and a target function gets honest proposals, while a buyer who arrives with only a budget gets whatever fits the vendor’s catalogue. The complete process fits six steps: define the goal, collect the site data, size power and energy, choose the architecture, lock compliance and safety, and write the RFQ. This guide walks each step from a buyer’s seat, flagging where proposals quietly drift from the design intent.
Every page on this site assumes the same discipline: the acronym, components and cost structure are covered elsewhere, but a specification is where they come together. If the component vocabulary is new, the anatomy in #52 BESS components is the right primer, and the economics that justify a project are in #56 BESS cost and ROI. This article assumes the project is already justified and moves straight to sizing and specification.
Step 1 — Define the goal and the value stream you are designing for
The single most common design error is skipping this step and sizing to a round number — “a 500 kWh system” — with no job in mind. The goal decides every downstream parameter, and different goals pull the design in different directions:
| Primary goal | Dominant sizing input | Typical duration | Design consequence |
|---|---|---|---|
| Solar self-consumption | Daily PV surplus shape | 2–6 h | Energy sized to surplus; one daily cycle |
| Demand charge reduction | Peak window shape and kW spike | 1–4 h | Power-led sizing against the peak |
| Backup / UPS duty | Critical load list and outage history | Hours, per site policy | Power-led, low-cycle; prioritised circuits |
| Arbitrage / grid service | Tariff spread and market signals | 1–8 h | Energy-led with fast control and EMS logic |
One project often stacks several goals. The discipline is to rank them, because a battery cannot be simultaneously optimised for one daily solar cycle and for emergency backup with a month of standby — the two pull state-of-charge policy in opposite directions. Write the priority order into the design brief; it will later decide the EMS logic, which is the layer described in #52’s component guide. The peak-shaving sizing logic specifically is worked through in #57 peak shaving with batteries.
Step 2 — Collect the site data before you talk to any vendor
A credible design starts with a data pack, and the data pack has five parts. Load profile: at least twelve months of interval data (15-minute or hourly) from the utility meter or a logger, showing weekday, weekend and seasonal shapes — this is the single most valuable document in the whole process. Tariff structure: energy rates, demand charges, time-of-use windows and any feed-in terms, because the value of shifting energy is defined by the price difference between windows. PV production if solar exists or is planned: the surplus shape that storage can capture. Outage history if backup matters: frequency, duration and which loads were affected. Site constraints: available floor or wall space, access for installation, distance to the main panel, ventilation, and any structural or permitting limits.
Buyers who arrive with this pack can demand design-grade proposals instead of catalogue offers. Buyers who do not have interval data should install a logger for a representative season before commissioning a design — a month of real data beats a year of estimates, and the cost of logging is trivial compared with the cost of an oversized or undersized system. Three specific parameters deserve extra scrutiny because they drive sizing errors: the winter peak vs summer peak split (many sites peak in one season only), the baseline the tariff charges against (some utilities use a ratchet over several months), and power factor behaviour if the site pays reactive charges.
Step 3 — Size power, energy and duration as three separate decisions
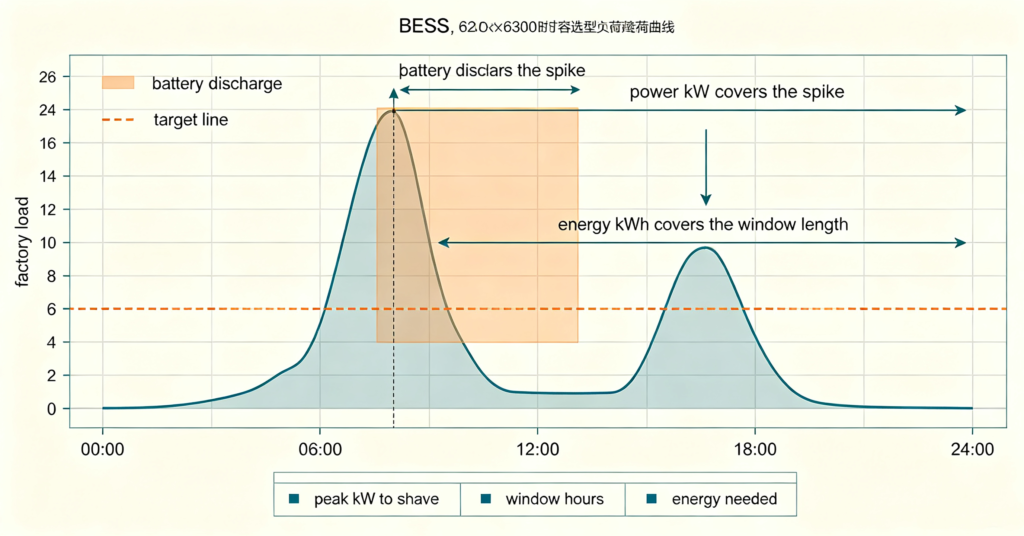
Sizing is three linked but separate decisions, and conflating them is where proposals quietly grow. Power (kW) is set by the biggest job: the peak kW to shave, the PV surplus rate to capture, or the critical load to back up. Energy (kWh) is set by how long the power must be sustained: peak window length, surplus duration or backup policy. Duration is the ratio of the two and is a design choice, not an accident — a 100 kW / 400 kWh system is a four-hour machine, and changing one number changes the whole rating line.
Three corrections apply at this step, all of them standard engineering practice. State-of-charge window: if the BMS and chemistry allow only 10–90% of nameplate for daily cycling, the usable energy is 80% of nameplate, and the system must be sized against usable energy, not label energy. Degradation over the contract life: capacity fades with cycling and calendar age, so systems are often designed to still meet the year-10 requirement, which means buying more initial capacity. The cycle-life economics behind that decision are analysed in #46 cycle life vs price. Temperature derating: chemistry performs below datasheet values at extreme temperatures, so the thermal design in Step 5 must keep the cells inside the window the sizing assumes. A conservative designer writes the assumption list into the spec — usable window, end-of-life threshold, ambient range — so that every bidder sizes against the same rules.
Step 4 — Choose the architecture the goal actually needs
Once the numbers exist, the architecture question is about how the battery connects and controls. The first fork is coupling topology: an AC-coupled system bolts onto the AC side of an existing solar and load bus, while a DC-coupled system shares the PV inverter’s DC bus. AC coupling is the common retrofit answer because it works with existing equipment; DC coupling improves round-trip efficiency in new solar-plus-storage builds. The full comparison is in #43 AC vs DC coupling. The second fork is integration level: an all-in-one unit bundles battery, inverter and controls in one box, while split systems let the buyer choose each component. The trade-off between flexibility, service and price is covered in #42 all-in-one vs split systems, and physical formats from rack to container in #53 C&I storage formats.
Two architecture decisions buyers often overlook are voltage level and control hierarchy. Low-voltage systems simplify installation and are typical below a few tens of kilowatts; higher DC bus voltages improve efficiency at larger scale but raise protection requirements. On the control side, the specification should state who owns the EMS, what data it exposes, and which protocols it speaks — a system whose EMS is a closed box is a system the buyer cannot operate or optimise later. These choices are exactly what separates a design from a quote, and they belong in the written spec rather than the sales call.
Step 5 — Lock compliance, safety and thermal design into the spec
Battery energy storage system design that ignores compliance gets rebuilt, not installed. The spec should name the standards the equipment must meet — internationally IEC 62619 for cell and battery safety, IEC 62477 or equivalent for power conversion, UN 38.3 for transport, plus the local electrical and fire codes for the installation country, and, in the US market, UL and NFPA-based system requirements. Fire risk is a design input, not an afterthought: the chemistry, enclosure, detection and suppression must be chosen together, because a containerised system and a wall-mounted home unit have different fire-load profiles. The safety and code framework is laid out in #44 BESS fire and safety codes.
Thermal design belongs in the same paragraph. Cells age faster outside their comfort band, and every kilowatt of discharge produces heat that must be removed — passively for small systems, with forced air or liquid cooling for cabinets and containers. The spec should state the ambient temperature range the site actually experiences, because a spec written for a climate-controlled hall will fail in an unshaded rooftop container. A buyer who writes the ambient range, the cycle profile and the end-of-life threshold into the requirements is doing the vendor’s engineering a favour; the vendor’s quoted price then reflects a real design instead of a hope.
Step 6 — Turn the design into an RFQ that survives comparison
The design work pays off when it becomes a document that makes vendors comparable. A disciplined RFQ for a storage system contains: the goal and priority order; the data pack (load profile, tariff, PV, site constraints); the required power, usable energy, duration and assumed SOC window; the ambient and installation conditions; the standards and certifications required; the performance terms to be warranted (usable capacity at year 10, round-trip efficiency at defined conditions); and the deliverables the vendor must return — datasheets, single-line diagram, thermal and fire design, EMS interface description, installation plan, commissioning test protocol and warranty text. The evaluation criteria should be stated before bids arrive, and the vetting of the vendors who respond is a separate discipline covered in #21 evaluating BESS manufacturers, while inverter-level supplier checks are in #50 evaluating inverter suppliers.
The seven design errors that show up in every bad proposal
- Sizing to label energy instead of usable energy inside the SOC window
- Ignoring degradation, so the system fails its own year-10 requirement
- Designing to a summer load curve and discovering a winter peak after install
- Buying a high-energy battery for a power job, or the reverse
- Leaving thermal design to the vendor without stating the real ambient range
- Accepting a closed EMS and losing the ability to change operating logic later
- Comparing bids without a common assumption list — every number means something different
The last error deserves emphasis because it is the most expensive. Two bids for “the same project” can differ in price by a wide margin while both are honest — one sized against usable energy with a real thermal design, the other against label capacity in ideal conditions. A written assumption list converts that confusion into a spreadsheet column. The cost structure that makes these differences visible is explained in #56 BESS cost and ROI.
Q. What is battery energy storage system design?
It is the process of turning a site’s goal and data into a written specification of power, energy, architecture, compliance and performance. The output is a design brief that suppliers price against, so the buyer controls the requirements instead of accepting a catalogue offer.
Q. How do I size a battery energy storage system?
Size power from the biggest job — the peak to shave, surplus to capture or load to back up — then size energy from how long that power must last, and check duration, usable SOC window and degradation. Twelve months of interval load data is the foundation of any honest sizing.
Q. What data is needed to design a BESS?
The core pack is a 12-month load profile, the tariff structure, PV production if relevant, outage history if backup matters, and site constraints such as space, access and ambient temperature. Tariff windows and seasonal peaks matter more than a single annual bill.
Q. How long does a BESS design take?
With data in hand, a design-grade specification can be produced in days to a few weeks. The long pole is almost always data collection — installing a logger and waiting for representative weeks or seasons — not the engineering calculation itself.
Q. Can my installer do the design for me?
An installer or integrator can, but a buyer who keeps design ownership gets better outcomes: the requirements are then fixed before pricing, and competing bids become comparable. Many buyers prepare the design brief themselves and use the installer for engineering detail, installation and commissioning.
Next step: turn the brief into a shortlist
A sound design brief makes the vendor conversation shorter and more honest.
- Check the components your spec must name in #52 BESS components
- Model the return on the numbers in #56 BESS cost and ROI
- Vet the suppliers who respond via #21 evaluating BESS manufacturers
- Send the leekooenergy engineering team your load data and goal priority; the reply is a design-grade proposal, not a catalogue page