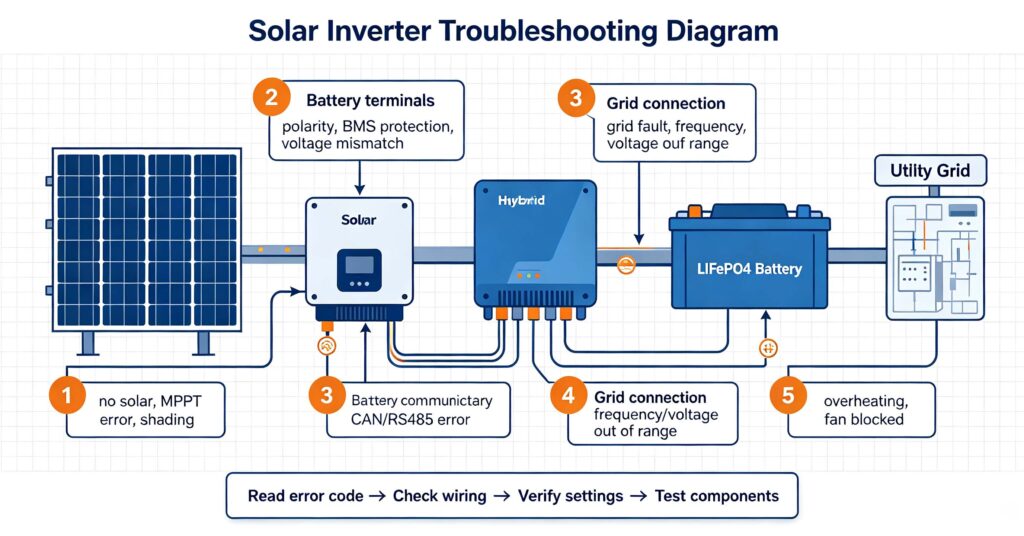
Solar inverter troubleshooting usually starts with reading the error code or indicator, then checking the five common fault points in order: the PV input (no solar, MPPT error, shading), the battery connection (polarity, BMS protection, voltage mismatch), the inverter-battery communication (CAN/RS485 error), the grid connection (grid fault, voltage/frequency out of range), and the inverter itself (overheating, blocked fan). The single most common reported problem — the battery not charging — is rarely a dead inverter: it is almost always one of a small set of causes: the BMS protecting the battery (overvoltage, low temperature, or imbalance), a wrong or missing communication setup between inverter and battery, a PV input too small or absent to charge, or an inverter charge setting that disables or limits charging. The troubleshooting sequence that resolves most cases is: read the error code, confirm the battery’s own state (voltage, temperature, protection via the BMS app), verify the communication link, check the PV and grid connections, then check the inverter settings. Never bypass the battery BMS to force a charge. This guide walks through each common inverter fault, how to diagnose it, and how to prevent recurrence. For selecting the right inverter in the first place, see #17 how to choose a storage or hybrid inverter.
When a solar system’s battery stops charging, the natural first suspicion is the inverter — but in most field cases the inverter is healthy and the cause is upstream or in the settings. Solar inverter troubleshooting is systematic: read the code, isolate the section, and confirm with measurements. This guide covers the most common inverter faults, with emphasis on the battery-not-charging problem, and gives a repeatable diagnosis sequence. For the compatibility side of inverter-battery setups, see #18 battery-inverter compatibility: CAN and RS485.
The battery is not charging: the most common inverter issue
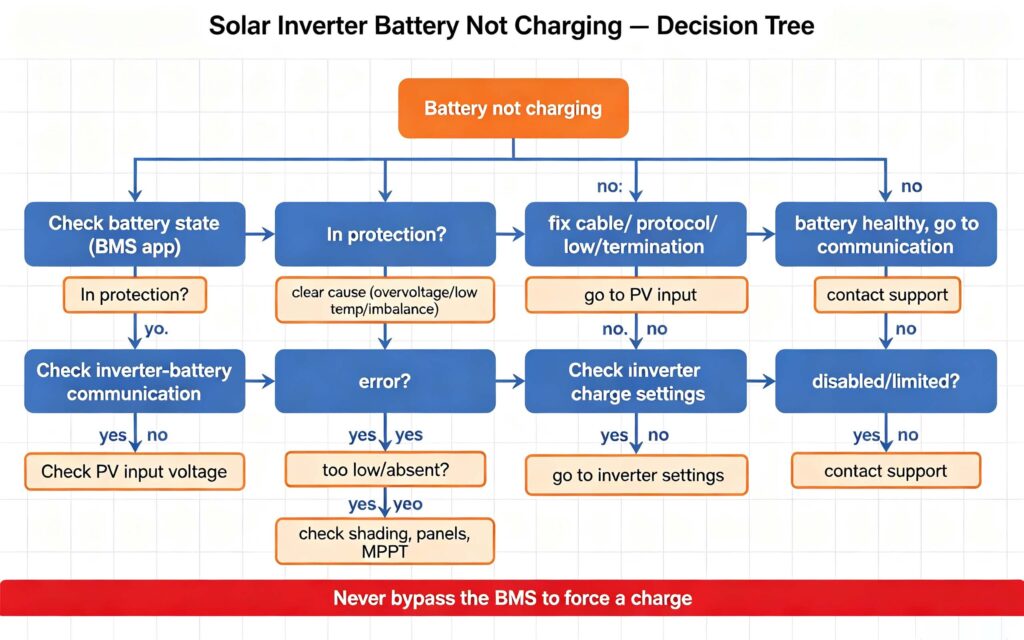
Battery-not-charging is the most reported solar inverter problem, and it has a handful of causes. Before touching the inverter, confirm the battery’s own state: is it in protection, is it within its voltage and temperature window, and does it communicate with the inverter?
The top causes: the BMS protecting the pack (overvoltage, low temperature, or a cell imbalance that triggers a cutoff — the BMS opens the charge path, so the inverter cannot push current); a missing or misconfigured communication link (if the inverter cannot “see” the battery, many units refuse to charge or default to a wrong profile); a PV input that is too small or shaded (solar charging needs enough panel output); or an inverter charge setting that is off, limited, or set to discharge-only. Diagnosis: read the battery’s state in the BMS app, check the communication cable and protocol, confirm PV voltage is present, and review the inverter’s charge settings. For BMS-side causes, see #108 common BMS faults and troubleshooting.
Inverter-battery communication errors
Communication errors are a close second in frequency. The inverter shows a communication fault, cannot read the battery state of charge, or uses a default profile that charges incorrectly.
Diagnosis order: check the cable (loose, reversed, or damaged CAN/RS485), confirm the protocol and baud rate match on both devices, verify the termination (120-ohm at the bus ends for CAN), and confirm the BMS is powered and communicating. Many communication faults are wiring or settings. Once the link is confirmed, the inverter should read the battery correctly. See #30 BMS technology for the protocol fundamentals.
Grid faults, PV faults and inverter overheating
Beyond battery-side issues, solar inverters report a few common environment and self-protection faults.
Grid faults appear when the grid voltage or frequency is outside the inverter’s operating window, or during a momentary grid disturbance. The inverter disconnects to avoid back-feeding. Diagnosis: confirm the grid is actually within range (a faulty grid or a loose connection), then let the inverter reconnect after its set delay. Persistent grid faults on a stable grid point to a connection, meter, or settings problem.
PV faults show as no solar input, low production, or an MPPT error. Causes include shading, dirty panels, a bad string connection, a tripped DC breaker, or a panel degradation fault. Diagnosis: check DC voltage at the inverter, inspect strings and shading, and confirm the MPPT channels are configured.
Overheating trips the inverter’s thermal protection when it exceeds its operating temperature, common in hot climates or blocked installations. The fix is ventilation and shading; repeated trips on a new system indicate a siting or sizing problem. Always let the inverter cool before restarting.
Systematic troubleshooting sequence
Follow the same order on every solar inverter troubleshooting call to find the cause fast and avoid chasing symptoms.
- Read the error code: the display, app or LED pattern tells you which section to inspect first. Record it before changing anything.
- Confirm the battery’s own state: use the BMS app or meter to check voltage, temperature and any protection flag. A protected battery blocks charging no matter what the inverter does.
- Verify communication: confirm the cable, protocol, baud rate and termination between inverter and battery.
- Check PV and grid inputs: confirm DC voltage is present and the grid is within range.
- Review inverter settings: check charge enable, charge current, discharge limits and any scheduling that might block charging.
- Correct and observe: fix the cause, let the system clear the fault, and verify normal operation over a cycle.
For choosing an inverter that avoids these issues in the first place, and for capacity matching, see #79 hybrid inverter sizing vs battery capacity.
Q. Why is my solar inverter not charging the battery?
The most common causes are: the battery BMS protecting the pack (overvoltage, low temperature or imbalance), a missing or misconfigured inverter-battery communication link, a PV input too small or shaded to charge, or an inverter charge setting that is disabled or limited. Diagnose in that order: check the battery state in the BMS app, confirm communication, verify PV voltage, then review the inverter settings.
Q. How do I fix a solar inverter communication error with the battery?
Check the communication cable first: confirm it is the right type, correctly seated, not reversed, and undamaged. Then verify the protocol (CAN or RS485) and baud rate match on both the inverter and the BMS, and confirm CAN termination (120-ohm at the bus ends) is present. If settings look right, power-cycle both devices. Most communication errors are cable or settings problems, not hardware failures.
Q. Can a grid fault stop my battery from charging?
Yes. When the grid is out of range or disturbed, the inverter disconnects from the grid to avoid back-feeding, and in many systems this also stops grid-charging or limits operation. Solar charging may still work depending on the inverter’s islanding capability. If the grid is stable but the fault persists, check the grid connection, meter and settings rather than assuming the inverter is at fault.
Q. Is it safe to bypass the BMS to charge a protected battery?
No. The BMS opens the charge path because a real condition exists — overvoltage, low temperature or imbalance. Bypassing it to force a charge can damage cells, create a fire risk, and void the warranty. Correct the underlying cause instead: recharge the pack properly, bring temperature into range, or let it balance. If the battery stays in protection with healthy parameters, contact support.
Q. Why does my inverter overheat and shut down?
Inverters trip thermal protection when they exceed their operating temperature, commonly in hot climates, direct sun, or poorly ventilated installations. The fix is to improve airflow, shade the unit, and reduce dust buildup on the heatsink and fan. If a new system trips repeatedly, review the siting and sizing. Let the inverter cool before restarting; persistent overheating with good ventilation may indicate a fan or hardware fault.
Next step: troubleshoot the cause, not the symptom
Solar inverter troubleshooting is about isolating the section that actually has the problem. The battery-not-charging case is almost always the BMS, the communication, the PV input, or the settings — not a dead inverter. Read the code, confirm the battery state, verify communication and inputs, then correct the cause. Never bypass protection to force a charge.
- Choose the right inverter in #17
- Check inverter-battery compatibility in #18
- Diagnose BMS faults in #108
- Ask leekooenergy for an inverter and battery troubleshooting package that includes: error-code interpretation for your inverter model, correct battery-inverter communication setup (protocol, baud rate, termination), the battery BMS state check procedure, recommended PV and grid connection checks, and a clear path to technical support — so you can diagnose solar inverter faults quickly and safely, without bypassing protection or replacing healthy components