
solar panel mounting brackets are the hardware that fix a PV module to a roof, a ground structure or a rail — and they are the components that decide whether the array stays where it was installed. This guide covers the main bracket families, the loads they actually have to carry, the material and corrosion choices, and the sequence to follow when specifying hardware for a real roof or ground site.
Brackets are the least discussed part of a PV installation and the most consequential when something goes wrong. A module that comes loose is a safety incident, not a service call. Choosing solar panel mounting brackets correctly starts with the surface you fix into.
The main bracket families
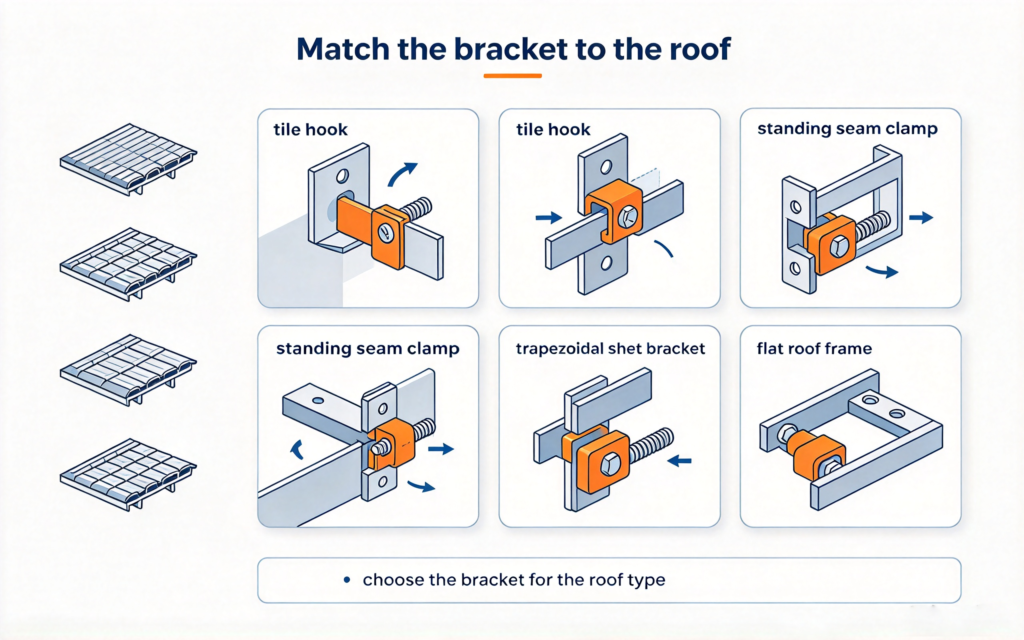
Roof brackets divide by roof type. Pitched roofs with tiles or shingles use a hook or a flashing-mounted bracket that replaces or lifts a course and seals the penetration. Metal standing-seam roofs use a clamp that grips the seam without penetrating the sheet at all — the cleanest detail where it applies. Trapezoidal and corrugated sheets use a bracket shaped to the profile, fixed through the sheet into the purlin below.
Flat roofs usually sit the array on a ballasted or penetrating frame at a fixed tilt, which is a structure question as much as a bracket question. Ground mounts use posts or a driven pile with a bracket at the top of each. Rail-less systems clamp the module directly to the fixings, removing the rail and its clamps at the cost of less tolerance in layout. The solar panel racking system guide covers how these fit into a complete structure, and the ground mounted solar panels guide covers ground foundations.
What the hardware actually has to carry
Three loads matter. Gravity is the easy one: the dead weight of the modules plus the frame, carried continuously. Wind is the one that fails installations, and it acts in two directions — pressing down on the array and, more dangerously, lifting it. Uplift is what pulls fixings out of a roof, and it is why wind exposure and roof zone matter more than module weight. Snow adds a sustained downward load where it applies.
Corrosion and thermal movement are the quiet ones. Dissimilar metals in contact through a wet path corrode, which is why stainless fasteners into an aluminium bracket need isolation, and why a coastal site needs a material and coating specification rather than a generic one. Thermal cycling works fixings loose over years, so the fixing method and any locking provision matter as much as the initial strength.
| Load | Direction | What it dictates |
|---|---|---|
| Dead load | Down | Fixing pull-out, roof capacity |
| Wind uplift | Up | Fixing type, spacing, roof zone |
| Snow | Down | Tilt, spacing, frame strength |
| Thermal cycling | Cyclic | Locking provision, re-torque plan |
Material and finish
Aluminium dominates brackets because it is light, corrosion-resistant and easy to extrude into the profiles these systems need. Steel appears where strength per cost matters, primarily in ground structures, and it must be galvanised or otherwise protected. Stainless is used for fasteners, and the grade matters in coastal and industrial atmospheres.
Watch the interfaces. An aluminium bracket against a copper roof, or a stainless bolt through an uncoated steel purlin, creates a galvanic couple that will corrode in the presence of an electrolyte — which is what rain is. Ask for the isolation detail, not just the material list. Structural compatibility is why the solar roof tiles versus panels comparison treats integrated roof products as a different category from bolt-on arrays.
How to specify for a real site
Start with the roof or ground surface, not the module. Identify what the fixing will actually land in — a rafter, a purlin, a structural deck, or only sheathing — because fixing into sheathing alone is the single most common installation defect. Then establish the wind exposure and the roof zone, since edge and corner zones see much higher uplift than the field of the roof.
Then match the bracket to the surface, confirm the spacing that the uplift figure requires, and check the roof can carry the added load. On a flat roof, confirm the waterproofing method and whether ballast is allowed. Only then choose the module clamp. Working in that order prevents the common failure of designing a beautiful array for a roof that cannot accept the fixings.
Ground mounts and rail-less systems
On the ground, solar panel mounting brackets sit at the top of a post or pile and carry the same module loads plus the leverage of a taller structure. The governing question is no longer the roof surface but the foundation: what the post is set into, how deep, and whether the soil can resist the uplift the array will see. A ground structure that is perfectly adequate in still air can fail at the foundation in an exposed field, which is why exposure category drives the design.
Rail-less systems remove the rail and its clamps by fixing the module directly to each mounting point. That saves material and install time, and it reduces the number of interfaces that can corrode or work loose. The cost is tolerance: with no rail to adjust along, the fixing positions have to match the module frame accurately, and a layout error is much harder to absorb on the roof. On a complex roof with many obstructions, a railed system is usually the pragmatic choice; on a simple, regular roof, a rail-less one is often faster and cheaper. Either way the same rule applies — every fixing must land in structure.
Installation checks that prevent call-backs
Torque every fastener to the specification and record it. Use the sealing detail the bracket was designed with rather than an improvised bead of sealant. Verify that the fixing landed in structure on every point — not on a sample — and replace any that missed. Confirm the array is square and the clamps are seated on the module frame, not on the glass.
Plan for re-torque. A first re-torque after the initial thermal cycles catches what has settled, and it is far cheaper than a call-back. The what solar installers actually do piece covers what a competent installer actually does on the roof, and the MC4 connector guide covers the electrical side of the same install. For chisidal-supplied projects, send the roof type and the wind exposure, then ask for the bracket set and fixing pattern specified for that combination.

Fixing decisions that hold up
Choose brackets by the surface they fix into and the uplift they must resist, not by the module they hold. Get the fixing into structure on every point, isolate dissimilar metals, and re-torque after the first season.
Q. solar panel mounting brackets?
Solar panel mounting brackets are the hardware that fix a PV module to a roof, a ground structure or a rail. They are chosen by the surface they fix into and the wind uplift they must resist, and they decide whether the array stays installed.
Q. What types of solar mounting brackets are there?
The main families are tile or shingle roof hooks with flashing, standing-seam clamps that do not penetrate, brackets shaped to trapezoidal or corrugated sheets, flat-roof tilt frames, ground post brackets, and rail-less clamps that fix the module directly.
Q. Can I mount panels without penetrating the roof?
On a standing-seam metal roof, yes — seam clamps grip the seam without penetration. On other roofs, penetrations with a proper flashing detail are the norm, and ballasted flat-roof frames avoid penetration where the roof allows the weight.
Q. What is the most common installation mistake?
Fixing into roof sheathing rather than into a rafter or purlin. Every fixing point must land in structure, and uplift at the roof edges and corners is much higher than in the field of the roof.
Q. Aluminium or steel brackets?
Aluminium is standard for roof brackets because it is light and corrosion-resistant. Steel is used for ground structures where strength per cost matters and must be galvanised. Isolate dissimilar metals at every interface.
Q. How does wind affect bracket choice?
Wind uplift is the governing load, not module weight. It dictates the fixing type, the spacing and the pattern, and it is far higher at roof edges and corners than across the middle of the roof.
Q. Do brackets need maintenance?
Yes, a re-torque after the first thermal cycles and periodic checks of fixings and seals. Thermal cycling works fixings loose over years, which is why a re-torque plan is part of a competent installation.
Next step: specify from the roof upward
Brackets are chosen by the surface and the uplift, not by the panel. Send the roof type, the structure beneath it and the wind exposure.
- Confirm the structure with solar panel racking system guide before ordering hardware
- Check ground mounted solar panels if the array is going on the ground instead
- For chisidal, send your usage and site details, and we will come back with product prices, lead time and warranty information