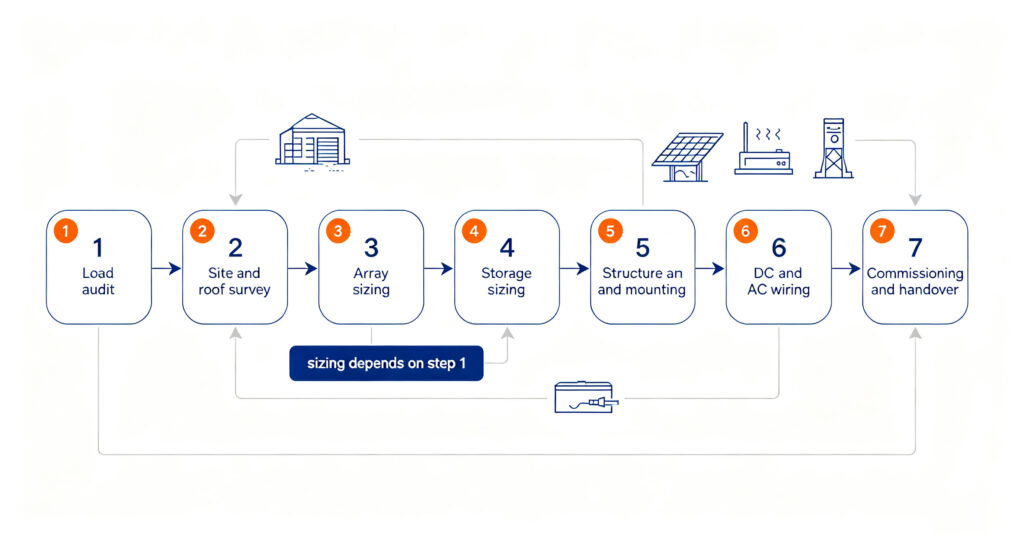
How to build solar power for a house, a farm or a small commercial site? The work runs in a fixed order: audit the load, survey the site, size the array, size the storage, build the structure, run the DC and AC wiring, then commission and hand over. The order matters because each step constrains the next one — the array size cannot be chosen before the load is known, and the storage size cannot be chosen before the load profile is known, because a system that stores energy no one uses at night is a system with a payback that never arrives. The one-line version worth quoting: the panel count is step three, not step one; every build that starts with panels ends up buying twice.
This guide is for someone who will own the system for a decade and wants to understand the sequence before handing money to a contractor, or before attempting part of the work. It does not replace a licensed electrician for grid-connected work, and it does not cover the paperwork of any single utility. It covers what each step decides, what has to be measured, and where builds go wrong. The material list that comes out of step five is itemised in #161 solar installation kit checklist; panel parameters are compared in #74 PV panel kits.
Step 1: the load audit
Two numbers come out of the audit, and they are not the same number. Total energy is how much electricity the site uses over a day, in kilowatt-hours; it sets the array size. Peak power is the largest simultaneous load, in kilowatts; it sets the inverter size. A site that uses 10 kWh a day with a 1 kW base load and rare 3 kW peaks needs a very different inverter from a site that uses 10 kWh a day entirely through a 3 kW workshop machine that runs for three hours.
The practical way to get both is a logger clamped on the supply for two weeks, or a readout from the utility meter if it reports interval data. Where neither is available, build the audit from the appliance list: nameplate wattage, hours per day, and whether the load is one that can be shifted to daylight hours. That last question is the one that changes the answer most, because a load that runs while the sun is up does not need storage at all. The home-side sizing walkthrough is in #09 how to size a home battery, and a hands-on worksheet approach is in #132 DIY battery sizing.
Step 2: site and roof survey
Four measurements decide whether the design is viable and what it will cost to build: the available unshaded area and its orientation, the roof or ground substrate, the distance from the array to where the inverter and battery will sit, and the condition of the existing electrical panel. Shading is the one that most often changes the design — a chimney or a tree that shades one corner of the array at 9 a.m. can take a disproportionate bite out of a string, because cells in series share one current.
The structural question runs in parallel: the roof must carry the added load, and the attachment method follows from the substrate. The full survey checklist is in #110 installation site assessment.
| Step | Decides | Depends on | Typical failure if skipped |
|---|---|---|---|
| 1 Load audit | Array kWh, inverter kW, storage kWh | Meter data or appliance list | Oversized array, undersized inverter |
| 2 Site survey | Layout, attachment, cable run | Area, shading, substrate | Shaded strings, wrong attachment hardware |
| 3 Array sizing | Module count and string layout | Step 1 + local irradiance | Array that cannot meet winter demand |
| 4 Storage sizing | Battery kWh and chemistry | Step 1 load profile | Battery that cycles shallowly and never pays back |
| 5 Structure | Rails, clamps, attachment count | Wind/snow load, frame thickness | Loose modules, roof leaks |
| 6 Wiring | Cable size, protection, earthing | String current and run length | Voltage drop, connector faults |
| 7 Commissioning | Handover and warranty | Test results and documentation | Faults found months later, no record |
Step 3: sizing the array
Array size follows from daily energy and local irradiance: divide the daily kilowatt-hours the array must supply by the peak sun hours the location receives, then divide again by the system efficiency after wiring losses, soiling, temperature and inverter conversion. The result is the array rating in kilowatts. Winter is the design case for anyone who wants to run through the year on solar, not summer — a system sized on a July irradiance figure will underperform in December by a margin that surprises people every year.
String layout then has to satisfy the inverter input window: the open-circuit voltage of the string at the lowest expected temperature must stay under the inverter’s maximum DC voltage, and the string voltage under load must stay above the inverter’s start and MPPT minimum. Getting this wrong is the reason some arrays produce nothing until mid-morning or trip on a cold clear day.
Step 4: sizing the storage
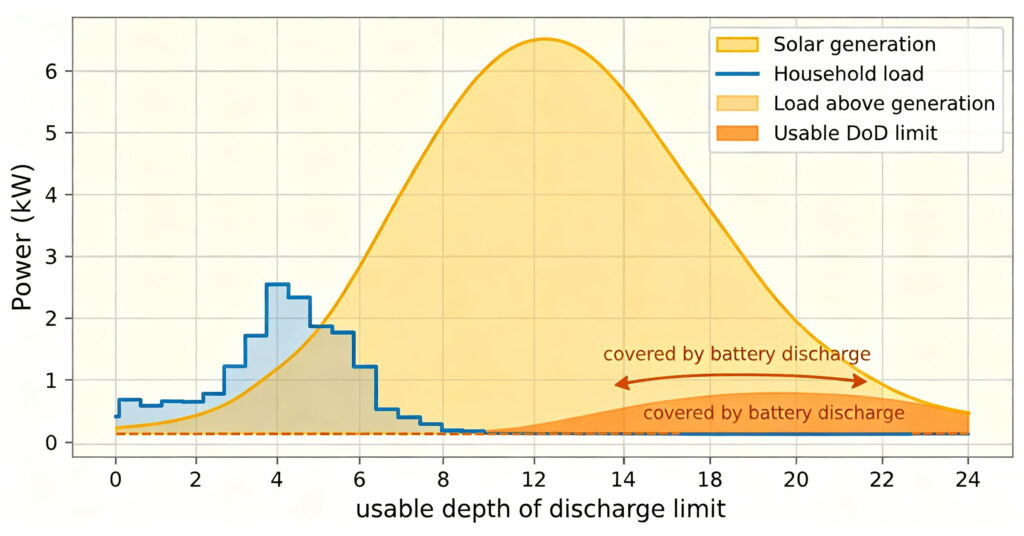
Storage is sized from the load profile, not from the array. The useful question is how much of the daily energy is consumed after sunset, and how many hours of autonomy the site needs when there is no sun at all. Multiply the evening and overnight energy by the number of backup days wanted, then divide by the usable depth of discharge the chemistry allows — a lithium iron phosphate bank typically allows a far deeper usable window than a lead-acid bank, so the same usable kilowatt-hours needs a smaller nameplate capacity.
Chemistry and voltage platform come next. For a small system a 12V or 24V bank is still common; above a few kilowatts the current at those voltages becomes the problem, and 48V is the usual answer. The platform trade-offs are in #157 24V solar battery and #12 48V vs 51.2V; the chemistry comparison is in #33 LiFePO4 vs NMC.
Step 5: structure, then step 6: wiring
Structure comes before wiring for a reason: the array position sets the cable run, and the rail layout sets where the string cables can be routed. Attach the rails to the load calculation, clamp the modules with hardware matched to the frame thickness, and only then start pulling cable. Cable sizing is a two-step check — current rating first, voltage drop over the actual run second — and every termination should be made with the correct crimping tool rather than by hand. The material list is in #161 the BOS checklist, and the safety envelope for the work is in #128 installation safety requirements.
Step 7: commissioning and handover
Commissioning is where the system becomes someone’s responsibility. Before energising: insulation resistance on the DC side, polarity and open-circuit voltage on every string, torque values recorded on the terminations, and the inverter configured to the correct grid code or off-grid profile. After energising: a full charge and discharge cycle observed, the monitoring connected, and the as-built documentation handed over. The test sequence used on larger systems is in #111 BESS commissioning.
Where builds go wrong
Five mistakes account for most of the rework when you build solar power, and every one of them is cheap to avoid at the design stage.
- Starting with the panel count instead of the load, which produces an array that cannot be matched to an inverter properly.
- Ignoring shading at the wrong hour, which costs more energy than a whole extra module would have.
- Undersizing the cable on the current check but not the voltage drop check.
- Mixing connector brands, which leaves a latent DC fault that appears months later.
- Sizing storage to the array rather than to the evening load, which buys capacity that never cycles.
Two variants change the sequence. A grid-tied system with no storage skips step four and hands all the exported energy to the utility; an off-grid system makes step four the largest single cost and makes the generator question part of step one. The architecture comparison is in #72 off-grid and on-grid systems, and the living-off-grid case is in #23 off-grid solar system batteries. Small islanded sites with their own distribution are covered in #114 microgrid battery storage.
Q. How to build solar power from scratch?
How to build solar power, in order: audit the load, survey the site, size the array, size the storage, build the mounting structure, run the DC and AC wiring with correct protection, then commission and hand over with test records. Each step constrains the next, so starting with the panel count instead of the load audit is the most common cause of rework.
Q. How many panels do I need for my house?
It depends on your daily kilowatt-hour consumption and your local peak sun hours, not on the roof area. Divide the energy the array must supply by the peak sun hours for the worst month you want to cover, then divide by system efficiency after wiring, soiling, temperature and inverter losses. A roof area only tells you the maximum array that will fit.
Q. Can I build solar power myself?
Partly. Site survey, mechanical mounting and, in many regions, the DC wiring on an off-grid system are within reach of a careful DIY builder. Grid connection, any work inside the consumer unit and the final certification normally require a licensed electrician, and utility permission is required before a grid-tied system is energised.
Q. How much battery storage do I need?
Size it from the energy consumed between sunset and sunrise, multiplied by the number of backup days you want, divided by the usable depth of discharge of the chemistry. Sizing the battery to the array rating instead almost always buys capacity that never cycles deeply enough to pay back.
Q. What permissions are needed?
Almost everywhere a grid-connected system needs the utility’s approval before it is switched on, and most regions require a building or electrical permit for the structural and electrical work. Off-grid systems usually avoid the utility permission but may still need an electrical permit. Check both before ordering hardware.
Next step: get the load audit right before you buy anything
How to build solar power comes down to one document. Produce the load profile and the array, inverter and storage sizes follow from it.
- Itemise the hardware in #161 solar installation kit checklist
- Size the battery in #09 how to size a home battery
- Compare architectures in #72 off-grid and on-grid systems
- Send leekooenergy your daily kilowatt-hour figure, your evening load and your required autonomy hours — and ask for a storage recommendation that states the usable capacity at the depth of discharge actually used, the voltage platform, and the cycle life at that duty